Getting started (beginner)
This guide assumes you have never used a terminal. Follow it from top to bottom. The first time takes about an hour, almost all of it connecting your accounts. You do that once. Every product after that takes a few minutes of your time.
Nothing here can spend money without asking you. The only purchase is your domain name, and Shipyard shows the price and waits for you to type the word buy.
Step 1. Have these ready
- A bank card.
- An email inbox you read.
- A name for your product and the web address you want for it, for example
tidetable.app. - A free account at each of these. Open each link and sign up if you have not already: GitHub (stores your code), Railway (runs your site, $5 a month), Cloudflare (your domain name), Resend (sends your emails), Stripe (takes payments), Sentry (reports errors) and Anthropic (the AI in your product).
Step 2. Open the terminal
The terminal is a window where you type a line of text and press Enter. Everything Shipyard does starts there.
- Windows. Press the Windows key, type
PowerShell, press Enter. - Mac. Hold Cmd and press Space, type
Terminal, press Enter.
To run a command from this page: press the copy button next to it, click inside the terminal window, press Ctrl+V (Cmd+V on a Mac), then press Enter. Wait until it stops printing text before you paste the next one.
Step 3. Install Node.js
Node.js is the free program Shipyard runs on. Check whether you have it:
node -v
- It prints something like
v22.11.0, with a first number of 20 or more: go to step 4. - It prints an error or a lower number: open nodejs.org, download the button marked LTS, open the file and click Next until it finishes. Then close the terminal, open it again as in step 2, and run
node -vonce more.
Step 4. Install Shipyard
- Open your account page.
- Copy the install command shown there.
- Paste it into the terminal and press Enter. It takes about a minute.
- Check it worked:
shipyard
You should see a short status screen. If the terminal says it cannot find shipyard, close it, open it again and retry.
On Windows, if you see red text saying that running scripts is disabled on this system, run this line once, answer Y if it asks, then repeat the install:
Set-ExecutionPolicy -Scope CurrentUser RemoteSigned
Whenever you are lost, type shipyard on its own. It tells you where you are and which command comes next.
Step 5. Connect your accounts
Shipyard works inside your own accounts, so each one has to let it in. The pass it needs is called a token: a long password that an account makes for a program. You make one per account.
Go back to your account page and copy the second line, the one that starts with shipyard start. Paste it into the terminal and press Enter. It loads the stack you picked and your licence, then opens Shipyard. On later visits you only need:
shipyard setup
A page opens in your browser. It looks like a website, but it runs on your own computer: what you paste there goes into your computer’s password vault and is never sent to us. Leave the terminal window open while you use it.
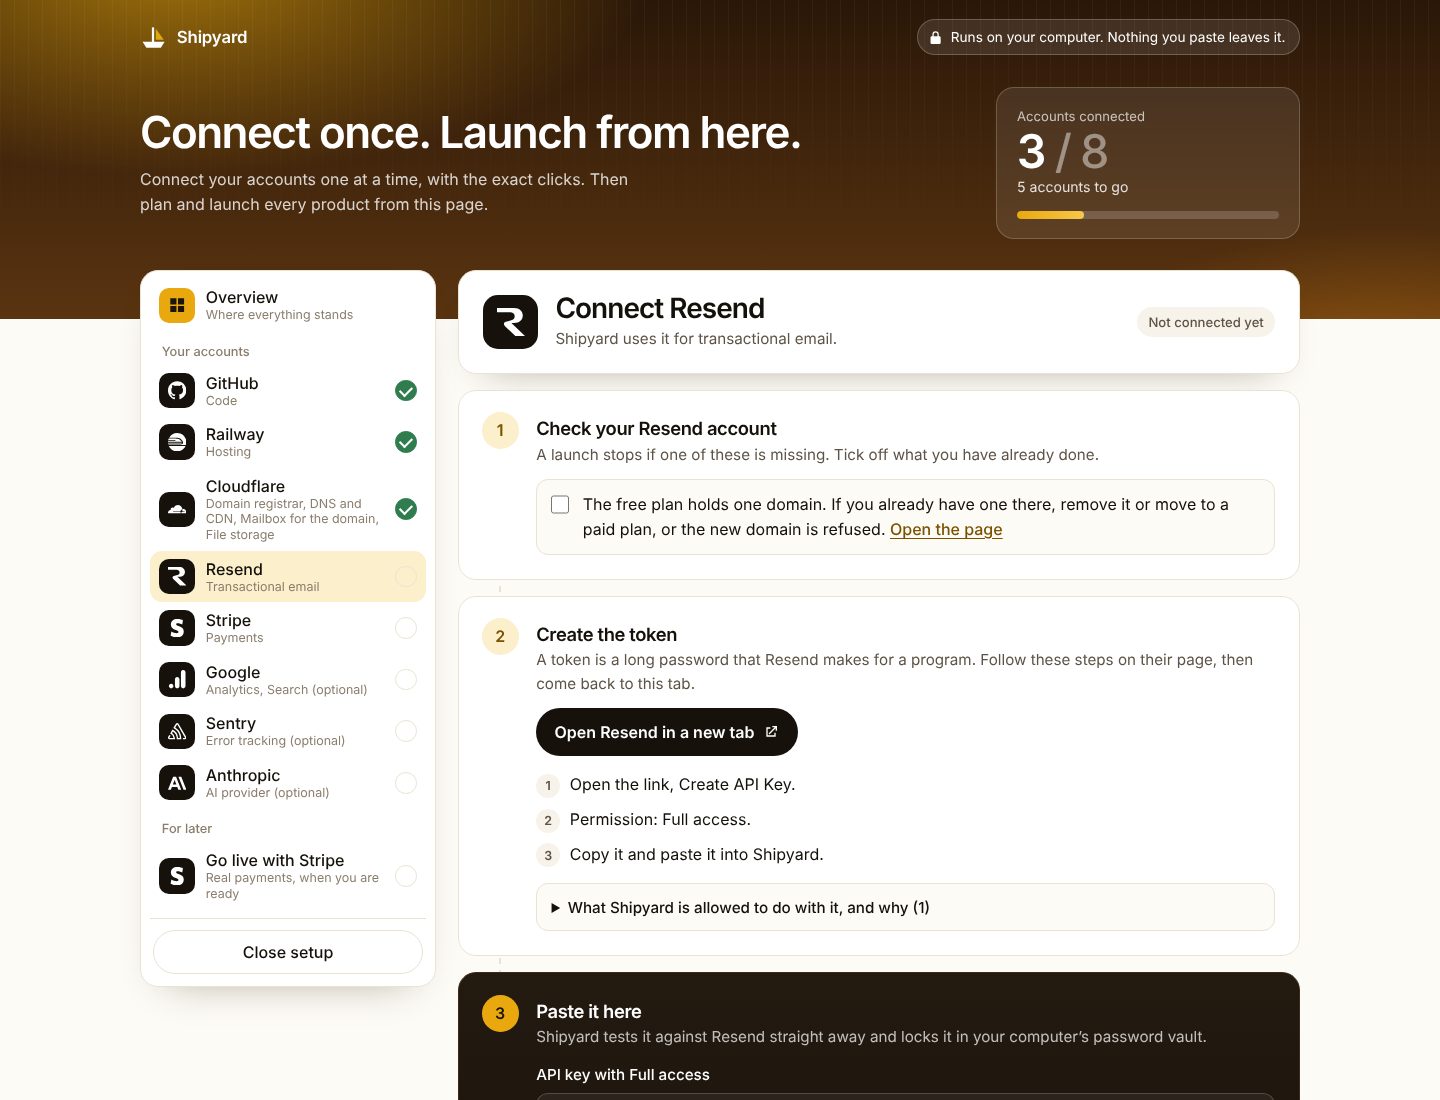
The page takes you through your accounts one at a time. For each one:
- Tick off the short checklist of things that account needs switched on. Each has a link to the right page. Skip any you have already done.
- Press the button that opens the account’s token page. For GitHub and Cloudflare most of the form is already filled in. Follow the numbered steps next to it.
- The account shows you the token once. Copy it.
- Paste it into the box on the setup page and press Test and save. A green tick means it works. If it does not, the page says what to fix.
- Press Next.
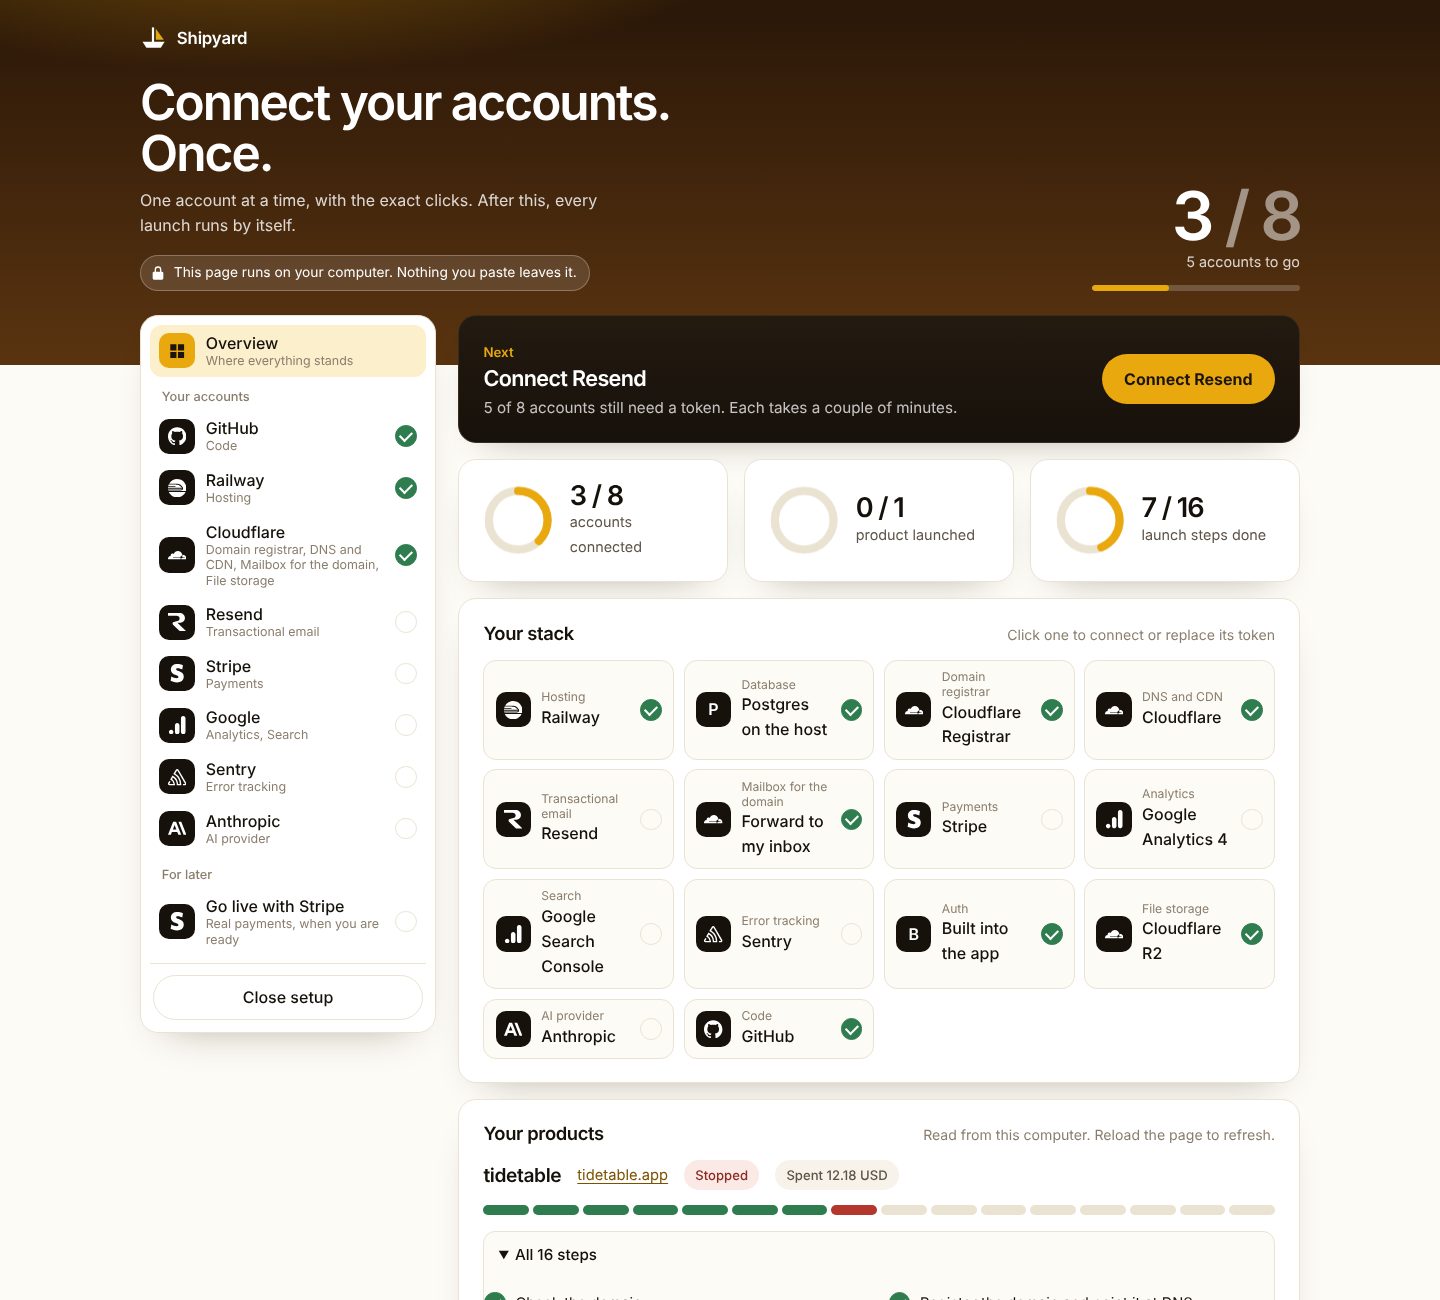
When the counter at the top shows every account connected, you are done.
The dashboard
The first entry on the left, Dashboard, shows where everything stands: which accounts are connected, your stack, and every product you have launched with each of its steps. A box at the top always names the one thing to do next. Open it at any time with shipyard setup.
What you can skip
Some accounts are optional. The page marks them “optional” and gives each a Skip for now button. Your product launches without them, and you can add any of them later by running shipyard setup again.
- Can be skipped: Google (visitor statistics and Google Search), Sentry (error reports), file storage and mail forwarding.
- Always needed: GitHub, your host, Cloudflare, Resend, Stripe and your AI provider. The site cannot go live, send its sign-in emails, take payments or run its AI features without them.
Using Claude Code, Cursor or Codex instead
If Shipyard is connected to your coding tool, you can skip the terminal for this step. Say “set up Shipyard” and it opens the same page. The tool never sees your tokens.
Step 6. Describe your product
On the setup page, press Launch at the bottom of the list on the left. Fill in four things:
- Name. Short, lower case, no spaces, such as
tidetable. - Web address. The address you want, such as
tidetable.app. Tick the box under it if you already own it. - Your email. Mail sent to hello@ your new address will arrive there.
- What it is. One paragraph, the way you would explain it to a friend.
Press Save and review the launch. Nothing has been created yet.
Step 7. Review the launch
This screen lists everything Shipyard is about to set up in your own accounts, in order, and what those providers charge you for it: once, per month and per year. These are not Shipyard fees; your Shipyard licence is already paid. Check two things: the web address is spelled exactly as you want it, and the only purchase is that address. A domain purchase cannot be refunded.
Step 8. Do a practice run
Press Rehearse first. This walks through the whole launch with pretend accounts while you watch each step tick off. Nothing real is created and nothing is paid.
Step 9. Launch
Go back to the review and press Launch for real. Stay near your computer for the first few minutes. You will be asked for two things:
- A box appears with the price of your web address. Type the word
buyin it and press Buy it. Nothing is bought until you do. - Cloudflare sends an email to your inbox asking you to confirm mail forwarding. Click the link in it.
The rest runs by itself and takes 15 to 30 minutes, mostly waiting for the new address to start working. Leave the page and the terminal window open.
If it stops
Sometimes an account wants something first. The page shows the step it stopped at and why, in plain words. Do what the message says, then press Try again from this step. It carries on from where it stopped. It never does a step twice and never buys anything twice. If the message does not make sense to you, copy it into Claude or ChatGPT and ask what to do, or send it to us.
Step 10. Build your product
Your site is now live with a starter page. Shipyard has also written the instructions an AI coding tool needs to build your actual product on it. On the dashboard, press Get the build prompt next to your product, then Copy the prompt, and paste it into Claude Code or Cursor. Every change that tool saves goes live on your address by itself.
Those tools fetch your code with a free program called Git. Check whether you have it:
git --version
If that prints a version number, you are set. If it prints an error, download Git from git-scm.com, open the file and click Next until it finishes, then close the terminal and open it again. Installing and launching with Shipyard itself does not need Git.
Step 11. Take real payments
Your site starts with payments in practice mode, so you can try buying with the test card number 4242 4242 4242 4242. When Stripe has approved your business details, switch to real payments:
- Run
shipyard setupand open Go live with Stripe at the bottom of the list on the left. - Follow its steps to paste your live Stripe key.
- Back on the dashboard, press Switch to real payments next to your product. It asks you to confirm first.
Then buy your own product once with a real card, check that it arrives, and refund yourself in Stripe.
Your second product
Your accounts stay connected. Next time, run shipyard setup, press Launch, and repeat steps 6 to 9.
Prefer typing commands?
Everything on the page also exists as a command. See Getting started and Commands.
Words used on this page
- Terminal. The window where you type commands.
- Command. One line of text you type or paste, followed by Enter.
- Token. A long password an account makes for a program. You can cancel one at any time on that account’s website.
- Domain. Your web address, such as tidetable.app. You pay for it once a year.
- Practice run. A run with pretend accounts, also called a dry run. It changes nothing.